
July 10, 2026 · 21 min
Spack Tutorial for Beginners
This tutorial is a hands-on introduction to Spack, a package manager designed for high-performance computing. It covers everything you need to get started: installation, core concepts like specs and environments, compiler configuration, binary caches, and development workflows. No prior experience with Spack is required.
By the end of this tutorial, you will have installed Spack, understood its key abstractions, set up an environment with real scientific dependencies, and built and run a mini-application. The tutorial uses Grid'5000 as a concrete example, but the concepts apply to any Linux machine or HPC cluster.
This tutorial is part of the NumPEx software integration strategy backed by the Exa-DI WP3 team. Our ambition is to have all NumPEx-related libraries packaged with Spack, make Spack-based deployment part of every developer’s arsenal, and work with computing centers to make Spack-based user-level software deployment as frictionless as possible.
This tutorial has been first posted here.
The slides version of this tutorial is available at https://thomas-bouvier.github.io/slides-spack-tutorial-for-beginners.
Why package managers? Why Spack?
The pain of setting up a complex software stack
If you have ever tried to build a scientific application from source on an HPC cluster, you know the feeling: the project depends on a dozen libraries, each with its own build system, configuration flags, and version constraints. Most of those libraries depend on yet more libraries, which depend on specific compiler versions, which may or may not be installed on your system.
The challenges pile up quickly:
- Heterogeneous languages and build tools. A single project might mix C, C++, Fortran, CUDA, and Python, each with different compilation requirements.
- Platform diversity. Code that builds on your laptop may not build on a cluster, and a working setup on one cluster rarely transfers to another.
- Combinatorial build options. Libraries like Kokkos, HDF5, or PETSc expose many compile-time variants (MPI support, GPU backends, index sizes, etc.), and getting the right combination is critical.
- Expertise bottleneck. Nobody can be an expert across the entire toolchain. We need a solution that is accessible to non-experts.
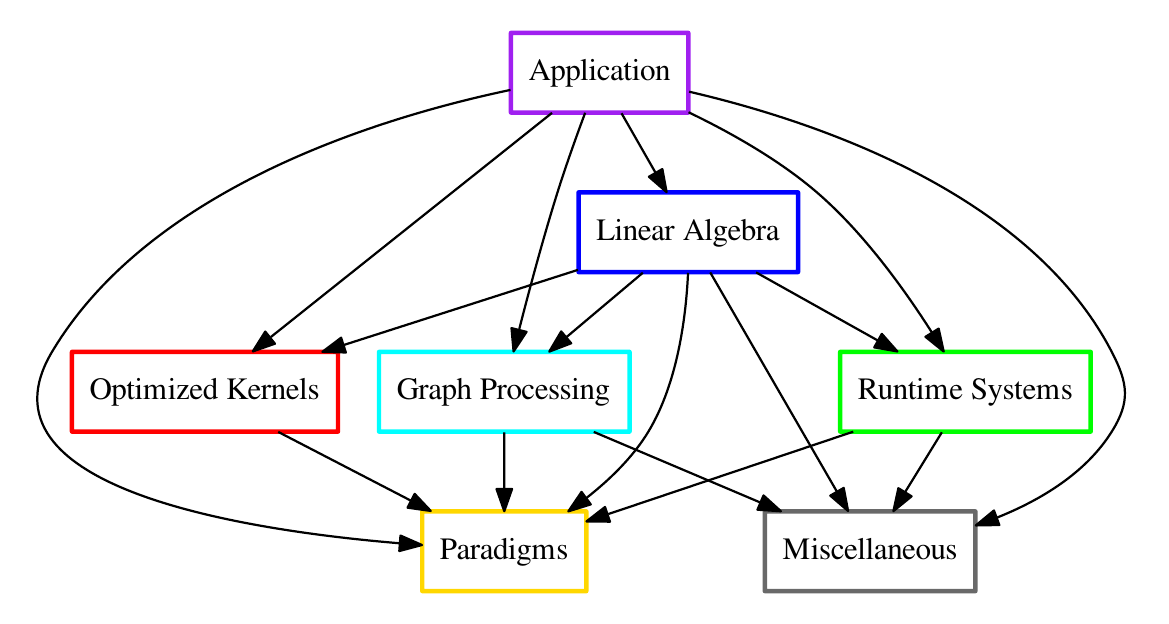
Take GyselaX as a concrete example. It builds on top of domain expert libraries spanning CUDA, HIP, SYCL, C++, C, Fortran, and Python. Its dependencies include DDC, Eigen, Koliop, Kokkos, kokkos-fft, Kokkos Kernels, Ginkgo, MPI, PDI, NetCDF, HDF5, Dask, Xarray, h5py, and matplotlib – to name just the direct ones. Some of these libraries are usually available on clusters, but not always built with the required options. Others are very unlikely to be installed at all.
Classical ways to deploy software (and their limits)
Manually installing libraries (git clone, cmake, make install, etc.) is the most common approach for researchers. It works for small dependency chains, but it is time-consuming, error-prone, and fundamentally not reproducible. Months later, you may not remember which flags you used, or the upstream project may have changed.
Environment modules (module load <name>) are a cleaner solution, widely used on HPC systems. The system administrator pre-installs software and exposes it through modules. This is convenient but has important limitations: you are restricted to the versions and configurations the admin provides, the setup is not portable across machines, and reproducing the exact same stack later is not guaranteed. Such modules might be removed by admins.
A package manager solves these problems
A proper package manager addresses all of these issues at once:
- Automated, reproducible installation of complex dependency trees.
- Adaptable to different platforms and architectures.
- Shareable configurations that can be version-controlled alongside your code.
- The ability to have multiple versions or configurations of the same package coexist without conflicts.
Why Spack in particular?
Several package managers exist for scientific computing, including GNU Guix and Nix. Spack stands out in the HPC space for several reasons:
- Designed for HPC. Spack was created at Lawrence Livermore National Laboratory specifically for supercomputers and scientific applications. It understands concepts like MPI providers, GPU backends, and microarchitecture-specific optimizations out of the box.
- Multiple configurations coexist. Unlike system package managers, Spack can install many versions and variants of the same package side by side. You can have
hdf5+mpi(HDF5 with MPI support) andhdf5~mpi(HDF5 without MPI support) installed simultaneously without conflicts. - From-source builds with binary caching. Packages are compiled from source by default, giving you full control over optimization flags and build options. In some cases, compiling from source unlocks performance gains. Pre-built binaries can be used through build caches to speed things up when customization is not needed.
- No root access required. Spack installs entirely in user space. You can set it up in your home directory on any machine where you have Python and Git.
- Dependency isolation through RPATH. Spack uses
RPATHto link dependencies, so executables are tied to the exact libraries they were built with. There is no need to manipulateLD_LIBRARY_PATHat runtime, and no risk of accidentally loading the wrong shared library.
Spack is a package manager for supercomputers, Linux, and macOS. It makes installing scientific software easy. Spack isn’t tied to a particular language; you can build a software stack in Python or R, link to libraries written in C, C++, or Fortran, and easily swap compilers or target specific microarchitectures.
Tutorial overview and setup
In this hands-on tutorial, we will:
- SSH into a computer center (Grid'5000 in our case).
- Install Spack and learn its core commands.
- Understand specs, concretization, and compiler configuration.
- Create an environment to install the Kokkos library and its dependencies.
- Build and run a Gysela mini-app that relies on Kokkos (optionally with GPU support).
The mental model
Before diving in, here are the key insights that will help you understand how Spack works:
- Install Spack by cloning the GitHub repository. You can have multiple independent Spack installations if needed.
- Activate Spack by sourcing a shell script. Until you do, Spack commands are not available.
- Available package recipes are determined by the GitHub recipe repository attached to your Spack clone. Updating or checking out a different branch gives you access to different package recipes.
- System packages can be integrated through a mechanism called “externals”, so Spack does not have to rebuild everything from scratch.
- Environments let you define a list of “package specs” to be installed together, similar to a requirements.txt in Python or a Gemfile in Ruby.
- Package specs are more than just names: they let you control versions, build options (like
+cuda), compilers, and target architectures.
Connecting to Grid'5000
For this tutorial, we use Grid'5000 as our HPC testbed. Please create an account if you need one. Connect to the Lille site:
$ ssh lille.g5k
Connection guide: https://www.grid5000.fr/w/Getting_Started#Recommended_tips_and_tricks_for_an_efficient_use_of_Grid.275000
Tip: Add the following to your
~/.ssh/configfor convenient access:Host g5k User login Hostname access.grid5000.fr ForwardAgent no Host *.g5k User login ProxyCommand ssh g5k -W "$(basename %h .g5k):%p" ForwardAgent noReplace
loginwith your Grid'5000 username. You can then connect with justssh lille.g5k.
Installing Spack
Spack only requires Python (3.6+) and Git. There is nothing to compile, no root access needed, and no system-wide installation. You simply clone the repository and source a setup script.
On the Grid'5000 frontend, clone Spack in your home folder:
$ git clone --depth=2 --branch=releases/v1.2 https://github.com/spack/spack.git ~/spack
$ cd ~
Tip: The
--depth=2flag creates a shallow clone, which is faster. The--branch=releases/v1.2flag checks out a specific release branch, ensuring you have a stable and known set of package recipes.
Now activate Spack by sourcing the setup script for your shell:
$ . spack/share/spack/setup-env.sh
For other shells:
- Fish:
source spack/share/spack/setup-env.fish - csh/tcsh:
source spack/share/spack/setup-env.csh
Verify that Spack is working:
$ spack --version
1.2.1
By default, everything Spack needs – the executable, the package recipe database transparently retrieved from https://github.com/spack/spack-packages, and the default configuration – lives inside ~/spack. This is what makes it possible to have multiple independent Spack installations, each with its own set of packages and configurations.
Note: The very first Spack command you run may be slow, as Spack builds internal caches to speed up future operations. Subsequent commands will be much faster.
Finding packages
Spack ships with recipes for over 8,000 packages. Before installing anything, you will want to browse what is available and inspect the details of specific packages.
Browsing packages
You can search for packages on the web at https://packages.spack.io, or from the command line:
$ spack list kokkos
hpx-kokkos  kokkos  kokkos-fft  kokkos-kernels  kokkos-nvcc-wrapper  kokkos-tools  py-pennylane-lightning-kokkos  py-pykokkos-base
==> 8 packages
The list command supports glob patterns. For example, to find all Python packages:
$ spack list 'py-*'
Inspecting a package
To see the available versions, variants (build options), and dependencies for a specific package, use spack info:
$ spack info kokkos
CMakePackage:   kokkos
Description:
    Kokkos implements a programming model in C++ for writing performance
    portable applications targeting all major HPC platforms.
Homepage: https://github.com/kokkos/kokkos
This output tells you the package type (here, a CMakePackage), its description, homepage, the list of known versions, and all the variants you can toggle. Understanding the available variants is crucial – they let you customize the build to your exact needs.
Understanding package specs
Spack’s most powerful concept is the spec (short for specification). A spec is a concise description of exactly how a package should be built: which version, which compiler, which variants are enabled or disabled, and which architecture to target.
From abstract to concrete
When you type a package name like kokkos, that is an abstract spec – it says what you want but leaves many details unspecified. Spack’s job is to fill in all the blanks, producing a concrete spec that pins down every single detail. This process is called concretization.
You can see what a concrete spec looks like with spack spec:
$ spack spec kokkos
 -   kokkos@4.7.03~aggressive_vectorization~atomics_bypass~cmake_lang~compiler_warnings+complex_align~cuda~debug~debug_bounds_check+debug_dualview_modify_check~deprecated_code~hip_relocatable_device_code~hpx~hpx_async_dispatch~hwloc~ipo~memkind~numactl~openmp~openmptarget~pic~rocm+serial+shared~sycl~tests~threads~tuning~wrapper build_system=cmake build_type=Release cxxstd=17 generator=make intel_gpu_arch=none platform=linux os=debian11 target=x86_64 %cxx=gcc@10.2.1
 -       ^cmake@3.31.11~doc+ncurses+ownlibs~qtgui ...
...
That is a lot of information! Every + or ~ is a variant that has been explicitly resolved, every @ is a pinned version, and the % section identifies the compiler. The ^ lines show dependencies (here, cmake).
Spec syntax in detail
Spack uses a compact syntax to express constraints. Let’s break down a typical spec:
kokkos @4.7.03 ~aggressive_vectorization target=x86_64 %c,cxx=gcc@10.2.1| Syntax | Meaning |
|---|---|
@4.7.03 | Version specifier. Install exactly this version. |
@4.7: | Version range. Any version starting from 4.7 (includes 4.7.00, 4.7.01, etc.). |
@:5 | Upper-bounded range. Up to and including version 5 (includes 5.x). |
+debug | Enable a boolean variant. |
~debug | Disable a boolean variant. |
cxxstd=17 | Set a single-valued variant. |
fabrics=verbs,ofi | Set a multi-valued variant (at least these values). |
target=x86_64 | Architecture target. Can be a family (x86_64) or a specific microarchitecture (skylake_avx512). |
%gcc@10.2.1 | Compiler. Build this package with GCC 10.2.1. |
^mpich@3 | Transitive dependency constraint. Require mpich version 3 somewhere in the dependency tree. |
Tip: When disabling a variant with
~on the command line, watch out for shell expansion. The shell may interpret~fooas a home directory path. To be safe, write variants without whitespace after the package name (e.g.,kokkos~debug).
Virtual dependencies
Some packages in Spack are “virtual”: they represent an interface rather than a specific implementation. The most common example is mpi, which can be satisfied by openmpi, mpich, intel-mpi, or any other MPI implementation. Spack handles this transparently: if your package depends on mpi, Spack picks a provider based on site policies. You can override this choice:
$ spack install hdf5 +mpi ^mpich
This forces Spack to use mpich as the MPI implementation for hdf5.
The concretizer (dependency solver)
The concretizer is Spack’s constraint solver. Given a set of abstract specs (your requirements), it resolves all versions, variants, compilers, and dependencies into a complete, consistent dependency graph (a directed acyclic graph, or DAG).
How it works
Imagine you specify two root packages in an environment:
PackageA@1.0: +mpiPackageB +cuda, which internally requiresPackageA@1.2: +cuda
The concretizer recognizes that PackageA must satisfy both constraints simultaneously. It determines that PackageA@1.2: +mpi +cuda is the solution, choosing a version that satisfies the @1.0: range from the first spec and the @1.2: range from the second, while enabling both the +mpi and +cuda variants.
This is solved as a SAT (Boolean satisfiability) problem internally. The result is what you see from spack spec: the full dependency tree with every detail pinned.
When concretization fails
Sometimes the constraints are unsatisfiable. For example:
$ spack spec kokkos@5
==> Error: failed to concretize `kokkos@5` for the following reasons:
     1. kokkos: '%gcc@:10.3' conflicts with '@5:'
This error tells you that kokkos@5 requires a compiler newer than gcc@10.3, but the only compiler Spack knows about is gcc@10.2.1:
$ spack compiler list
==> Available compilers
-- gcc debian11-x86_64 ------------------------------------------
[e]  gcc@10.2.1
The [e] marker means this compiler was detected as an external (system-provided) package. We need to make a newer compiler available – which is exactly what we will do in the next section.
Tip: When concretization fails, read the error message carefully. Spack’s error messages are usually precise about which constraint is violated and why. The most common causes are version conflicts, missing compilers, and conflicting variant requirements.
A note on reproducibility: Spack vs. Guix
An important design difference between Spack and other package managers like GNU Guix (or Nix) is how they handle system dependencies. Guix builds everything in complete isolation, all the way down to glibc. Spack, on the other hand, integrates with the host system: it typically uses the system’s gcc, glibc, and other base packages.
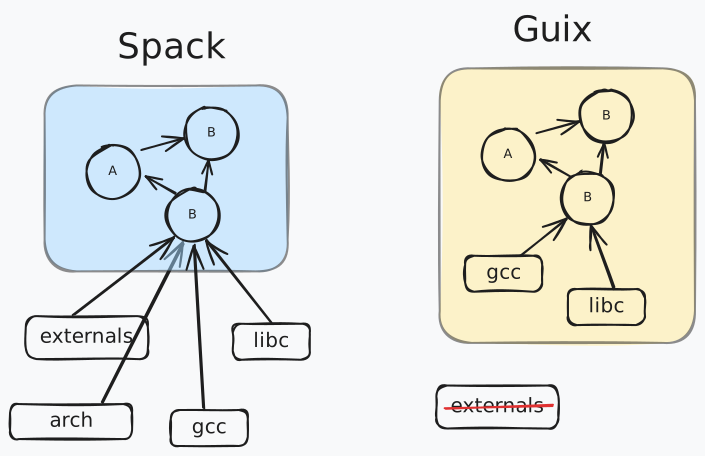
This pragmatic approach makes Spack easier to adopt on existing HPC systems, but it means Spack does not achieve bit-for-bit reproducibility the way Guix does. Instead, Spack significantly improves reproducibility compared to manual installations, especially when combined with lockfiles and binary caches (discussed later).
Configuring compilers
On most HPC systems, several compiler versions are available through environment modules. Spack needs to know about these compilers before it can use them.
Discovering available compilers
On Grid'5000, let’s see what is available:
$ module av
gcc/10.4.0  gcc/12.2.0  gcc/13.2.0 ...
Load a newer GCC version and tell Spack about it:
$ module load gcc/13
$ spack compiler find
spack compiler find scans your PATH for compilers and registers them. You can verify what Spack knows:
$ spack compiler list
==> Available compilers
-- gcc debian11-x86_64 ------------------------------------------
[e]  gcc@10.2.1  gcc@13.2.0
The newly loaded gcc@13.2.0 should now appear. Spack stores this configuration in ~/.spack/packages.yaml.
With a newer compiler available, our earlier kokkos@5 spec should now concretize successfully:
$ spack spec kokkos@5
Tip: If you regularly use multiple compilers, load them all and run
spack compiler findonce. Spack will remember them across sessions.
Bootstrapping Spack on Grid'5000
Before we start building packages, there is one practical consideration on Grid'5000: the build stage (where Spack compiles packages) should be on fast local storage, not on NFS. Configure this:
$ spack config --scope defaults:base add config:build_stage:/tmp/spack-stage
This tells Spack to use /tmp/spack-stage for compilation, which is local to the node and avoids NFS performance issues.
Tip: You may also want to set the
install_treeto Group Storage over NFS if you want your installed packages to persist and be shared across sessions and nodes.
Installing packages
Direct installation
The simplest way to install a package is:
$ spack install kokkos
Spack will concretize the spec (if not already concretized), download the source, build all dependencies, and install everything. You can then make the package available in your shell:
$ spack load kokkos
This modifies your PATH, LD_LIBRARY_PATH, and other environment variables so that the installed package is usable. To undo these changes:
$ spack unload kokkos
Why environments are better
While spack install and spack load work fine for one-off installations, they become unwieldy when managing a full software stack with many interdependent packages. Spack environments solve this by letting you:
- Define multiple root specs that are concretized together, ensuring consistency.
- Share and version-control the environment configuration alongside your project code.
- Isolate different projects from each other, avoiding conflicts.
Think of a Spack environment as the equivalent of a Python virtual environment or a Gemfile in Ruby, but for compiled software.
Spack environments
Creating and activating an environment
$ spack env create gysela-io
$ spack env activate gysela-io
The first command creates a new managed environment under $SPACK_ROOT/var/spack/environments/gysela-io/. The second command activates it, meaning all subsequent Spack commands operate within this environment.
Tip: Use the
-pflag to show the active environment in your prompt:$ spack env activate -p gysela-io [gysela-io] $ ...To deactivate, use
spack env deactivateor the shorthanddespacktivate.
The environment file: spack.yaml
Every environment is defined by a spack.yaml file. You can edit it directly with:
$ spack config edit
A minimal environment looks like this:
spack:
  specs:
  - kokkos
  - hdf5 +mpi
  view: true
  concretizer:
    unify: true
The key fields are:
specs: The list of root packages you want installed. These are abstract specs – Spack will concretize them.view: Whentrue, Spack creates a merged view (a directory with symlinks) that makes all installed packages accessible from a single prefix.concretizer: unify: true: Ensures that shared dependencies are unified across all root specs. For example, if bothkokkosandhdf5depend oncmake, they will share the samecmakeinstallation. This is the recommended default for most users.
Adding packages to an environment
You can add specs to the active environment from the command line:
$ spack add kokkos
This appends kokkos to the specs list in spack.yaml. The package is not installed yet – it is just recorded as a requirement.
To request specific variants, simply include them in the spec:
$ spack add kokkos +wrapper +cuda cuda_arch=60
Grid'5000 GPU note: Nodes
chifflot-[1-6]on the Lille site are equipped with 2 x Tesla P100 GPUs, which have compute capability 6.0. That is why we usecuda_arch=60.
Building a real-world environment: the Gysela mini-app
Now let’s put everything together with a real-world example. We will set up an environment to build a Gysela mini-app that depends on Kokkos and several other libraries.
Cloning the application
$ git clone --recursive https://github.com/thomas-bouvier/gysela-mini-app_io
Setting up the environment
The mini-app repository includes a spack.yaml file with all the required dependencies pre-configured. Since the Gysela package is not (yet) in the official Spack repository, we use this project-provided environment file:
$ rm ~/spack/var/spack/environments/gysela-io/spack.yaml
$ cp ~/gysela-mini-app_io/spack.yaml ~/spack/var/spack/environments/gysela-io/
Tip: In practice, you would typically create an independent environment in your project directory instead of replacing managed environment files. Independent environments are created with:
$ spack env create --dir ./my_env
$ spack env activate ./my_env
This keeps the
spack.yamlco-located with your project code, making it easy to version-control.
Concretization
The workflow for any Spack environment is always: edit spack.yaml -> concretize -> install.
Concretization resolves all the abstract specs into concrete ones:
$ spack concretize
If you have previously concretized and want to start fresh (e.g., after changing the specs or adding a new compiler), force a full re-concretization:
$ spack concretize --force
Tip: After concretization, Spack generates a
spack.lockfile containing the fully resolved dependency graph. Commit bothspack.yamlandspack.lockto version control. The lock file enables others (or your future self) to reproduce the exact same build, even if Spack’s default preferences change over time. Creating an environment from a lockfile is as simple as:$ spack env create myenv spack.lock
Installing on a compute node
On Grid'5000 (and most HPC systems), you should compile on a compute node rather than on the login/frontend node. This avoids overloading the shared frontend and gives you access to more resources.
Reserve a compute node:
$ oarsub -I -p chiclet -l host=1/core=4,walltime=2:00:00
Once on the compute node, set up Spack again (since it is a new shell session):
$ . spack/share/spack/setup-env.sh
$ module load gcc/13
$ spack env activate gysela-io
$ spack install
spack install without arguments installs everything in the active environment. If the environment has not been concretized yet, Spack will concretize it automatically before building.
Handling compilation errors
If a package fails to build, Spack will report the error and point you to the build log. Common causes include:
- Missing system dependencies (install them with your system package manager).
- Compiler incompatibilities (try a different compiler version).
- Bugs in the package recipe.
If you believe the issue is a bug in the Spack recipe, please open an issue on the Spack GitHub repository. Once a fix is merged, you can pull it into your Spack installation with:
$ spack repo update builtin
Using a binary cache
Compiling everything from source can take a long time, especially for large dependency trees. Spack’s build cache (also called a mirror or buildcache) lets you download pre-built binaries instead of compiling from source.
When a mirror is configured, Spack automatically checks it during concretization and installation. If a matching pre-built binary is found, it is downloaded and installed in seconds instead of being compiled over minutes or hours.
Configuring a mirror
Add a mirror to your environment’s spack.yaml:
spack:
  specs:
  - ...
  mirrors:
    numpex-spack-mirror:
      url: oci://ghcr.io/numpex/spack-stack
The oci:// prefix indicates that this mirror is hosted on an OCI-compatible container registry (in this case, GitHub Container Registry). Spack supports many mirror backends, including local directories, HTTP servers, S3 buckets, and OCI registries.
When pushing to or fetching from a build cache, you can specify include and exclude patterns in the mirror configuration to control which specs are included in or excluded from the build cache. If a spec satisfies an include and exclude filter then the exclusion wins. By default, all specs are included and none are excluded.
spack:
  specs:
  - ...
  mirrors:
    numpex-spack-mirror:
      url: oci://ghcr.io/numpex/spack-stack
      include_binary:
      - "%gcc"  # include only specs that depend on gcc
      exclude_binary:
      - "^mpich"  # and any spec that depends on mpich
Ensuring binary compatibility
Pre-built binaries are tied to a specific architecture. If the binary was built for skylake_avx512 but your machine is x86_64, the binary may not be compatible. To ensure compatibility, you can lock the target architecture in your spack.yaml:
spack:
  packages:
    all:
      require: target=x86_64
This tells the concretizer to target the generic x86_64 architecture for all packages, maximizing the chances of binary cache hits at the cost of some microarchitecture-specific optimizations.
Inspecting installed packages
After installation, you can see what is installed in the active environment:
$ spack find
This shows all installed packages, their versions, and their variants. Add --long to see the full hashes, or --deps to show the dependency tree.
Tip: To force Spack to use only pre-built binaries (and fail if none are available), use:
$ spack install --use-buildcache only
Building and running the Gysela app
With the environment installed, all the dependencies are available. Now we can build the application itself using CMake:
$ cmake -S . -B build -DCMAKE_TOOLCHAIN_FILE=...
$ cmake --build build -j 4 -t gys_io
The CMAKE_TOOLCHAIN_FILE is generated by Spack’s environment view, making all installed packages discoverable by CMake.
Running the application
$ export PYTHONPATH=~/gysela-mini-app_io/python:$PYTHONPATH
$ ./launch_script.sh
The application uses Dask for distributed task execution. The launch script starts a Dask scheduler and workers, runs the simulation, performs analytics, and cleans up.
Retrieving results
You can copy the output plots back to your local machine for visualization:
$ rsync -r lille.g5k:gysela-mini-app_io/gysela_plots/ .
Development workflows
Spack is not just for installing dependencies – it also supports an efficient development workflow where you can modify package source code and have Spack rebuild only what changed.
Using spack develop
The spack develop command tells Spack to build a package from local source code instead of downloading it:
$ spack develop py-deisa-dask
By default, this clones the package source into a subdirectory of the environment. You can also point to an existing checkout with --path:
$ spack develop --path /path/to/my/checkout py-deisa-dask@develop
After running spack develop, the package gets a dev_path= variant that points to your local source. Now, every time you run spack install, Spack checks if the source has been modified (based on file modification times) and rebuilds the package and its dependents if needed.
This is particularly powerful for iterating on a library deep in the dependency graph: you change the code, run spack install, and everything that depends on it gets rebuilt automatically.
Tip: To avoid polluting a shared binary cache with development builds (which contain local paths and are not reproducible), exclude development specs from being pushed to the cache:
spack:
  mirrors:
    numpex-spack-mirror:
      url: oci://ghcr.io/numpex/spack-stack
      exclude_binary:
      - "dev_path=*"
Recommended workflows
For local development (recommended for most users):
- Create a Spack environment with a
spack.yamllisting your project’s dependencies. - Concretize and install the environment.
- Build your application as usual (e.g., with CMake), using the Spack-provided toolchain.
- Version-control
spack.yamlandspack.lockalongside your project code.
For advanced users and package maintainers:
- Write a Spack recipe (
package.py) for your package. - Use
spack developto iterate on the source code within the environment. - Contribute the recipe upstream to Spack’s built-in repository.
Advanced topics
External packages
External packages are software already installed on your system that Spack can use instead of building from source. Common examples include system MPI implementations, vendor-optimized math libraries (like Intel MKL), and licensed software.
Using externals has two benefits: it avoids redundant builds, and it lets Spack leverage vendor-optimized implementations that may perform better than generic builds.
Automatic detection
Spack can scan your system for known packages:
$ spack external find
This detects common packages like cmake, openssl, python, and others. For specific packages:
$ spack external find openmpi
Viewing configured externals
$ spack external list
Manual configuration
You can also configure externals manually in packages.yaml:
packages:
  openmpi:
    externals:
    - spec: "openmpi@4.1.2"
      prefix: /opt/openmpi-4.1.2
    buildable: false
Setting buildable: false tells Spack to always use the external version and never build its own. This is useful for system MPI implementations that are tuned for the cluster’s high-speed interconnect.
Tip: On HPC systems, it is common practice to use the system-provided MPI implementation as an external. Building your own MPI is rarely necessary and can lead to subtle performance issues if the interconnect drivers are not properly configured.
Writing a package recipe
If the software you need is not yet in Spack, you can write your own recipe. Spack provides a scaffolding command:
$ spack create -n my-package https://example.com/my-package-1.0.tar.gz
This creates a package.py file with a boilerplate recipe. The file is pure Python and defines how the package should be downloaded, configured, built, and installed. Spack detects the build system (CMake, Autotools, Meson, etc.) automatically and generates appropriate template code.
For more details on writing recipes, see the Spack Packaging Guide.